
Accounts payable is the outstanding bills a business owes money on. In many small businesses, the person who is responsible for paying these bills, will write out the checks as the bills come in or at predefined intervals (once a week, twice a month or even monthly).
Which is an acceptable practice. However, this can inhibit the business owner from having an accurate picture of the business's cash flow without calculating it manually or sorting through a large pile of papers. QuickBooks' accounts payable module, allows businesses to maintain their cash flow without the clutter or risk of not paying the bills on time. This also minimizes any surprises and the chance of affecting the business’ credit report adversely.
To utilize QuickBooks' accounts payable module businesses must set up vendors in the Vendor Center. After that, we recommend running the Accounts Payable Aging Summary (or detail) Report to gain an accurate picture of what's owed.
Having this more accurate view of accounts payable enables company owners to more efficiently identify ways to save money and maintain their credit report.
Using the Vendor Center in QuickBooks
To use the accounts payable module, enter bills enter into the Vendor Center or pull down menu Vendors.
Entering Bills in the Vendor Center:
Select the "Enter Bills" task. It will bring up a screen that looks like a check.
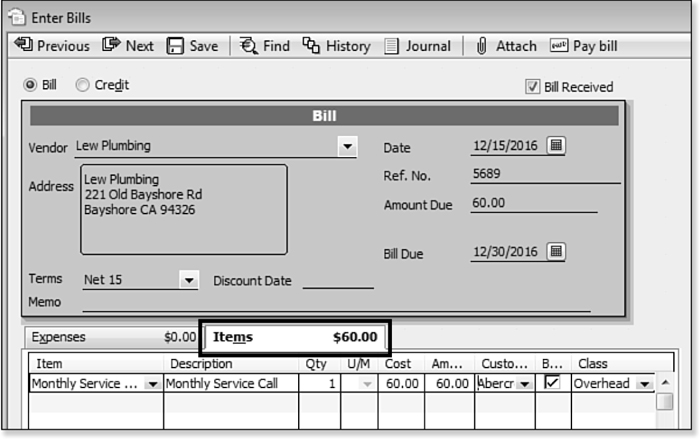
Enter the following in this screen:
- The vendor name,
- date of the bill,
- bill number,
- due date,
- and account that bill is being charged to,
A word of caution: watch the date you put into the bill as the date of the bill. Many clients enter the date the bill was received on. It should be the date on the original bill. This is especially important for accrual based taxpayers.
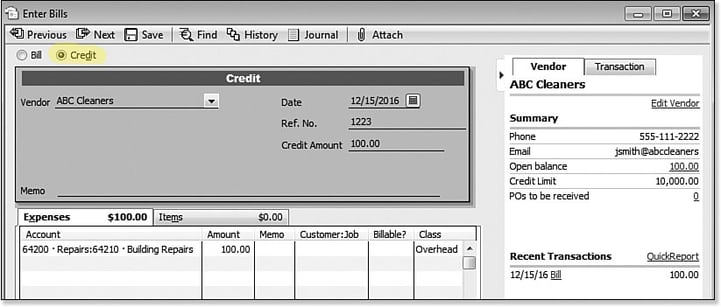
This screen is also where you would enter a credit you received from vendors. To complete this task in the enter bill screen, select the credit button.
Paying Bills in the Vendor Center:
When it is time to pay the bills, navigate to the Vendor Center or pull down menu Vendors and select, Pay Bills.
- A screen will appear with the preferences to either view all bills or those that are due on or before a certain date. Select either one based on preference.
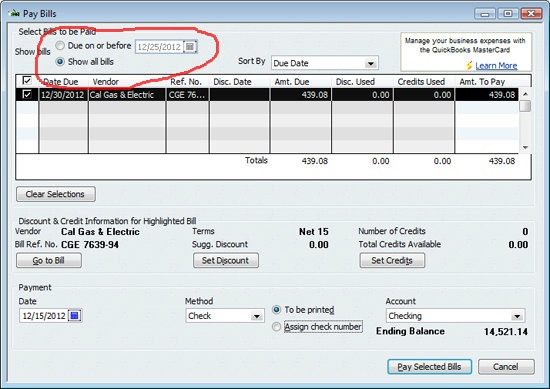
- Place a checkmark beside the bills that you're paying.
- The correct amount will fill in by default but you can change this to make a partial payment if need be.
- Select a payment method, such as a check or credit card.

- Review the selections made.
- After reviewing the screen, click on "Pay Selected Bills."
- Once paid the following will occur:
- The amount of money taken out of the cash account will be shown, while reducing the accounts payable balance.
- You will be notified of the transaction under the vendor center and that all reports are updated.
- QuickBooks will “stamp” the bill paid with a watermark to avoid confusion later on.


Notes & Words of Caution:
- Words of caution: if the business has more than one checking account, make sure the one that the correct account is showing under the pull down menu.
- the "Go to Bill," "Set Discount," and "Set Credits," optional buttons. These enable users to view the original bill, set a discount (if offered) and set a credit to the bill (if available)

- Checks (if this is the method of payment), can then be printed.
- If using laser checks to pay the bills, make sure you are using voucher checks compatible with the QuickBooks accounting software.

Accounts Payable Aging Summary Report:
The Accounts Payable Aging Summary (or detail) can be printed at any given time to review what is still owed.
This report is easily located by clicking on "Reports," "Vendors," "Payables," then "A/P Aging Summary Report." You will see a report that looks like this:

Use this report to identify:
-
Which vendors you still owe money to,
-
How much you owe,
-
And how long your balances have been owed.
Understanding how long you owed a balance to a vendor is a great way to improve your cash flow. This enables you to track the time between when you're invoiced and when you pay your bills. Which in turn can help to identify ways to save money or negotiate payment options with vendors. Not to mention it aids in identifying how to prioritize which bills to pay.
Conclusion:
Using the QuickBooks accounts payable module may seem like extra effort upfront. Yet, it helps to increase the business's efficiency by enabling the business to manage cash flow, reduce the risk of missing payments, and preserving their credit rating and valuable vendor relationships. In turn, decreasing the management efforts required of decisions makers.

